
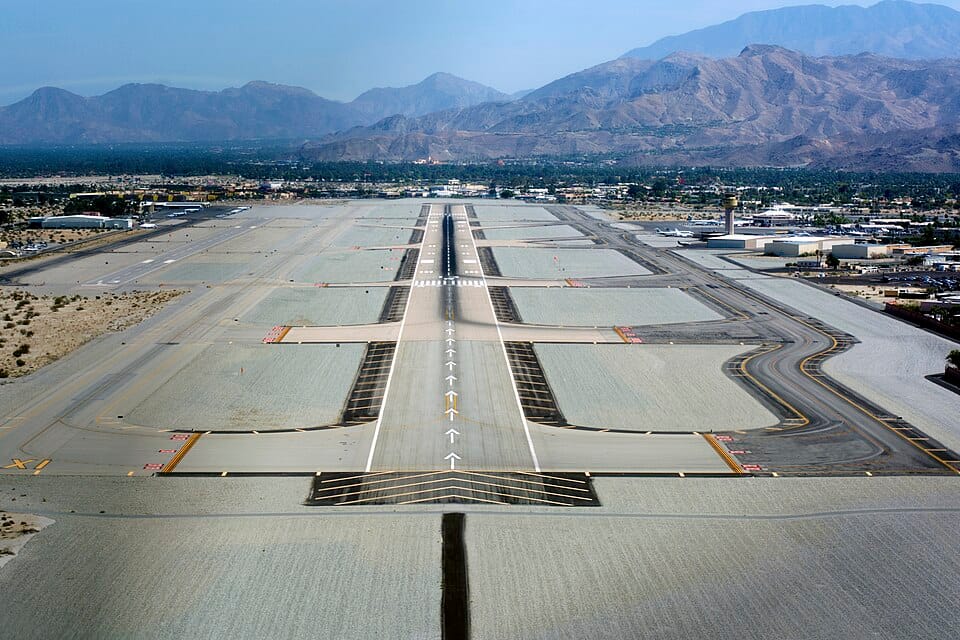
Every commercial airport runway is covered in white paint — stripes, numbers, rectangles, arrows, and chevrons that appear abstract from a passenger window but carry precise operational meaning for pilots. These markings are not decorative. Each one conveys specific information about where to land, where the usable pavement begins and ends, and what type of approach the runway supports. Misreading them — or not understanding them at all — can mean touching down in the wrong place, which in turn can mean not having enough runway to stop.
The system is standardized globally through ICAO Annex 14 and, in the United States, FAA Advisory Circular 150/5340-1. While pilots spend hours studying these markings during training, most passengers and aviation enthusiasts have no idea what they are looking at. This guide breaks down every major marking you will see on a runway, from the numbers at the threshold to the chevrons beyond the end.
Quick Facts
- Runway numbers indicate magnetic heading rounded to the nearest 10 degrees, divided by 10
- Runway markings are white; taxiway markings are yellow
- There are three levels of runway marking: visual, non-precision, and precision
- Threshold markings encode runway width (4 stripes = 60 feet, 16 stripes = 200 feet)
- The aiming point markers sit approximately 1,000 feet from the threshold
The Numbers: Magnetic Heading Made Simple
The large numerals painted at each end of the runway are the simplest and most recognizable marking. They represent the runway's magnetic heading, rounded to the nearest ten degrees and divided by ten. A runway oriented roughly east at a magnetic heading of 092 degrees becomes Runway 09. The opposite end, facing west at 272 degrees, is Runway 27. The two numbers at opposite ends always differ by exactly 18, because the two directions are 180 degrees apart.
At airports with parallel runways, a letter suffix distinguishes them: L for left, C for center, and R for right, as seen from the approaching pilot's perspective. Los Angeles International (LAX) has four parallel runways designated 24L, 24R, 25L, and 25R — the slight heading difference between the pairs reflecting a minor divergence in their alignments.

Threshold Markings: Where the Runway Begins
The threshold is marked by a series of longitudinal stripes — the bold white bars stretching across the runway width. These are not arbitrary. The number of stripes indicates the runway width: four stripes for a 60-foot runway, eight for 100 feet, twelve for 150 feet, and sixteen for 200 feet. A pilot approaching an unfamiliar airport can determine runway width at a glance from the threshold pattern — useful information for judging the flare height and crosswind correction.
Immediately before the threshold stripes sits a solid line running the full width of the runway. This threshold bar marks the precise beginning of the available landing surface. Anything before this line — including approach blast pads — is not rated for landing, even though it may appear to be perfectly good pavement.

Aiming Point and Touchdown Zone
The two large rectangular blocks painted roughly 1,000 feet from the threshold are the aiming point markers — also called the "thousand-foot markers.” (The nickname “piano keys” actually belongs to the striped threshold markings at the start of the runway.) These are where the pilot should be aiming during a normal approach. Not at the threshold, and not further down the runway — at these specific rectangles. Touching down at the aiming point ensures the aircraft uses the runway efficiently while remaining clear of the threshold area.
Beyond the aiming point, touchdown zone markings appear as pairs of rectangular bars at 500-foot intervals. These serve a dual purpose: they confirm distance from the threshold during the landing rollout, and they provide visual reference in reduced visibility. On precision-instrument runways, there are typically six pairs of touchdown zone markings, covering the first 3,000 feet of the runway — the zone where a properly flown approach should result in wheel contact.

Displaced Thresholds and Chevrons
Sometimes the usable landing zone does not begin at the physical start of the pavement. A displaced threshold — marked by white arrows pointing toward the landing direction — indicates that the initial portion of the runway is available for taxi, takeoff, and rollout, but not for landing. Displacements are typically created due to obstacles in the approach path such as buildings, terrain, or roads that require a steeper glide path than the normal three degrees.
Chevrons — yellow or white angled arrows — mark areas beyond the runway end that are not available for any aircraft operations. These blast pads or stopway areas may look like runway pavement, but they are not built to support aircraft weight during normal operations and are intended only as safety overrun areas. The visual distinction between chevrons, displaced thresholds, and active runway is critical, and it is tested repeatedly in pilot training and checkrides.
The Centerline and Edge Stripes
The dashed white centerline running the full length of the runway provides lateral guidance during takeoff, landing, and rollout. Each dash is 120 feet long with an 80-foot gap — a fact that becomes useful for estimating distance during rollout. If a pilot counts three centerline dashes passing beneath the aircraft, they have covered approximately 600 feet.
Edge stripes are continuous white lines marking the lateral boundaries of the full-strength pavement. On precision-instrument runways, these stripes are required and provide essential guidance in low-visibility conditions. The transition from white edge stripes (runway) to yellow edge markings (taxiway) is one of the clearest visual boundaries at any airport — and crossing that boundary at landing speed rather than taxi speed is exactly the kind of error that runway markings are designed to prevent.
The entire system — numbers, thresholds, aiming points, touchdown zones, centerlines, and chevrons — works together to give a pilot continuous visual information from the moment the runway becomes visible through the final rollout. It is a language written in paint, and for the pilots who read it every day, it is as natural and essential as any instrument in the cockpit.
Sources: FAA Advisory Circular 150/5340-1 (Standards for Airport Markings), ICAO Annex 14 (Aerodromes), Pilot's Handbook of Aeronautical Knowledge (FAA-H-8083-25B)
Related Questions
What do the numbers on a runway mean?
Runway numbers indicate the runway's magnetic heading, rounded to the nearest ten degrees and divided by ten. A runway pointing at a magnetic heading of 092 degrees becomes "Runway 09." The two numbers painted at opposite ends of the same runway always differ by exactly 18, because the directions are 180 degrees apart.
What do the letters L, C and R after a runway number mean?
At airports with parallel runways, a letter suffix distinguishes them from the approaching pilot's perspective: L for left, C for center, and R for right. Los Angeles International, for example, has four parallel runways designated 24L, 24R, 25L and 25R, the slight number difference reflecting a minor divergence in alignment.
How can you tell a runway's width from its markings?
The number of threshold stripes encodes the width: four stripes for a 60-foot runway, eight for 100 feet, twelve for 150 feet, and sixteen for 200 feet. A pilot approaching an unfamiliar field can judge the width at a glance, which helps in setting flare height and crosswind correction.
What are the "piano keys" on a runway?
The "piano keys" are the bold white longitudinal stripes painted across the runway threshold, marking where the usable landing surface begins. They are often confused with the aiming-point rectangles further down the runway, but the piano-keys nickname specifically belongs to these striped threshold markings.
What is the aiming point on a runway?
The aiming point is the pair of large rectangular blocks painted roughly 1,000 feet from the threshold, also called the "thousand-foot markers." Pilots aim for these rectangles on a normal approach, rather than the threshold or further down the runway, so the aircraft uses the available pavement efficiently while staying clear of the threshold.
What colour are runway markings?
Runway markings are white, while taxiway markings are yellow. The system is standardized worldwide through ICAO Annex 14, with United States specifics set by FAA guidance. There are three levels of runway marking: visual, non-precision, and precision, each adding detail for more demanding approaches.
What are runway touchdown zone markings?
Touchdown zone markings are pairs of rectangular bars placed at 500-foot intervals beyond the aiming point. They confirm a pilot's distance from the threshold during the landing rollout and give visual reference in reduced visibility. Misreading runway markings can contribute to landing errors, including landing at the wrong airport.
Why do pilots study runway markings so carefully?
Because each marking conveys precise operational information: where to land, where usable pavement begins and ends, and what kind of approach a runway supports. Misreading them can mean touching down in the wrong place with too little runway left to stop. Mastering these markings is part of a student pilot's path toward their first solo flight.


0 Comments